Wednesday, May 31, 2023

New PrintGiant.com is live!


We are thrilled to announce the launch of our brand-new PrintGiant.com, designed with you in mind! Our team has worked hard over the past several months to create a more enjoyable and efficient experience for all your printing needs. We have completely revamped our dashboard, quoting tool, category hierarchy, and product builder to make your journey with us smoother than ever before. Read on to discover the exciting enhancements we've made just for you!

A Simpler Dashboard


We listened to your feedback and agree that sometimes less is more. Our new dashboard is designed to be more user-friendly and easy to navigate, with less clutter and a cleaner layout. 


The profile, password, and account actions are now front and center, allowing you to access and manage your account settings quickly. The dozen or so buttons have now been reduced to three big buttons focusing on what you need most; Orders, Quotes, and Addresses—making finding and managing your printing projects effortless. As an extra convenience, you no longer have to click through multiple screens and scroll lists to access your open projects. All of your active orders and quotes are now displayed directly on the dashboard, providing easy access and a clear overview of your ongoing projects at a glance.

Improved Quoting Tool


We can be honest here. Our last quoting tool was atrocious. It was complicated, confusing, and nobody wanted to use it. So if you're one of those people, you'll be happy to know that we have significantly enhanced our quoting tool, making it super convenient and easy to use. Now, you have the flexibility to start your quote from an existing product or begin from scratch, depending on your specific requirements. Plus, our upgraded tool allows you to request multiple products and options within a single quote, saving you time and effort when planning complex print projects. These improvements will streamline the quoting process, enabling you to receive faster and more accurate quotes tailored to your needs.

Better Category Hierarchy


We've revamped our category hierarchy to make browsing our extensive range of print products even easier. Our new structure has three levels: category groups, categories, and products. This reorganization simplifies the browsing experience by allowing you to narrow down your search more effectively.


For example, under the category group "Marketing Materials," you'll find categories such as "Brochures," "Flyers," and "Postcards." Within each category, you can then explore individual products and their variations. This improved hierarchy will help you quickly find the exact print products you need, making your shopping experience more seamless and enjoyable.

Easier Product Calculator


Our new and improved product calculator has been designed to make selecting your custom print options a breeze. We've simplified the language throughout the product calculator, ensuring that even those with limited printing knowledge can easily understand the available options. We've also focused on presenting essential options for each product, streamlining the customization process, and removing clutter from unpopular choices. 
Other exciting new features of our product calculator are the estimated completion date, which provides you with a clear timeline for your project, and the ability to get real-time shipping quotes, making it easier to plan your shipping and delivery needs accurately. 

Try It Out


We invite you to explore our new website and experience the improved features and user-friendly design. To get started, click here and browse our wide range of print products and services. And to celebrate the launch of the new website and as a special thank you for your continued support, from June 1st to June 30th, 2023, we're offering a limited-time discount code: NEWWBST2310 for 10% off your first order on our new platform.

Don't miss out on this opportunity to enjoy a smoother, more efficient printing experience with our enhanced website. We're confident you'll love the improvements we've made, and we can't wait to continue serving you with the best possible service.

Always Improving


As we continue to improve and enhance our website, we value your feedback and suggestions. If you have any comments or suggestions or encounter any issues while using our new website, please don't hesitate to reach out.

Thursday, May 2, 2019

Proofing Quick Guide: How to proof your artwork


One of the most valuable aspects to the design process is proofing— getting a chance to review and leave feedback on your artwork. We do not send anything to print or consider it finalized until you give us the thumbs up.

We make proofing easy with a digital portal and tools to help you annotate your artwork on the spot. Your feedback will be sent directly to the designer, so they can make the changes easily and quickly.


Here is how you proof your artwork:


Accessing your proof.
When your design is ready, you will receive an email to let you know your proof is ready. Click on the ”VIEW PROOF” button within the review email and the proof will automatically open in a web browser.


Note: We recommend using a desktop or laptop computer to review your artwork.
For reviewing a proof on a mobile device, please download GoProof mobile app using the QR codes below.


Providing feedback.
Click “ADD COMMENT” (top bar, centered) and pick the best tool from the drop-down menu to annotate your design. Your comments will show up on the right side of the page under the “comments” tab, where you and your designer can see them. Make sure to mark all of your comments before sending the project back for changes.


R
equesting changes.
After you have marked all of your changes, click “REQUEST CHANGES”. This ends the proofing round and lets your designer know that you have reviewed your artwork and are ready for the next revision round.

Your designer will make your requested changes and re-submit your artwork to review.


Note: THIS IS A MANDATORY STEP. In order to let your designer know you are ready for changes, you must click "REQUEST CHANGES," otherwise your project will remain in-review.


Approving your design.
If you reviewed your artwork and you are ready to issue an approval, click “SIGN OFF”

This ends the proofing process and completes your project.


Note: THIS IS A MANDATORY STEP. By signing off on your document, you are giving us final approval and closing out the project. Do not click "finished" or "completed" if you are approving the project.


Tuesday, April 30, 2019

Using a Blank Template


We make it easy to provide your own graphic design for printed products by supplying product templates for every product, in every size. Our templates are designed specifically for our system and take into account many things that you or your designer may not be aware of. These templates will help speed your jobs through production by minimizing common errors and should be used every time you submit your artwork to print.

This guide will teach you how to use our supplied templates.


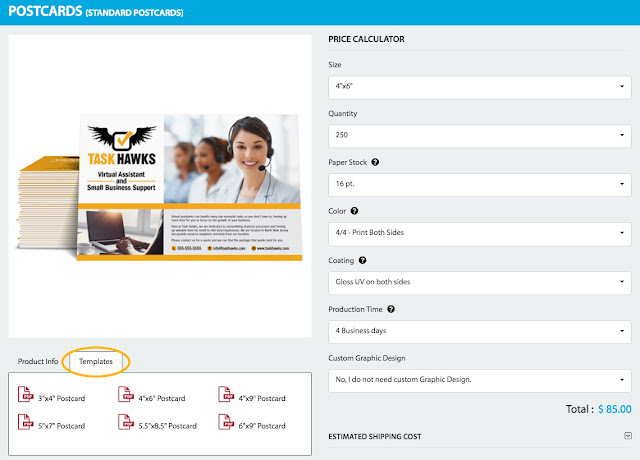
1) Download your template from the products page
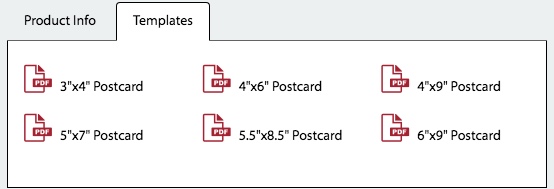
On the left side of the products page, click the “templates” tab (next to the “product info”).


2) Select the product size
Simply click the size product you would like to design and a vector based PDF template will automatically download.


3) Open the template in your design software
Our templates are vector-based and can be opened in all Adobe CC design software.


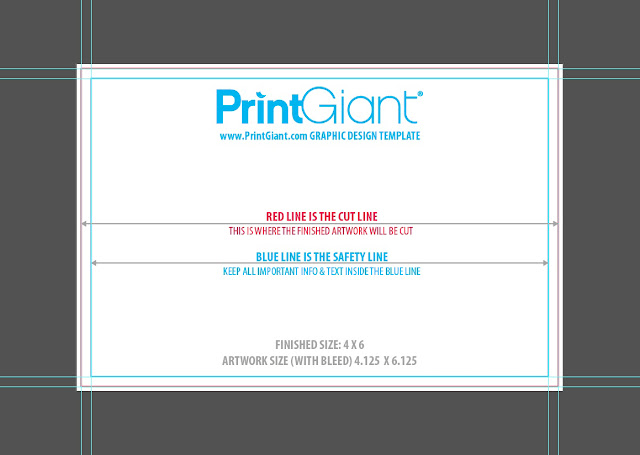
All templates will indicate the following:
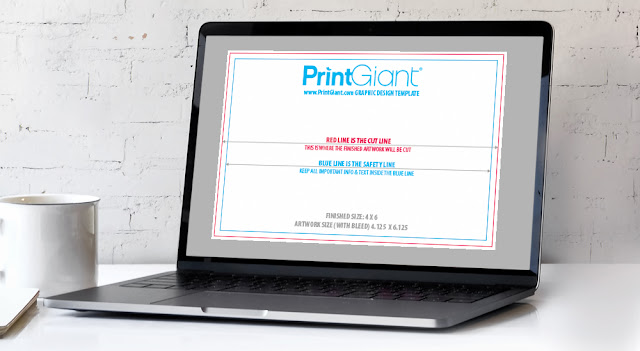
Artwork size (with bleeds)
Finished Size
Cut Line (red). This is where your artwork will be cut. Anything outside this line is considered your bleeds.
Safety Line (blue). All important information must be inside this area.
Fold Lines (green) if applicable


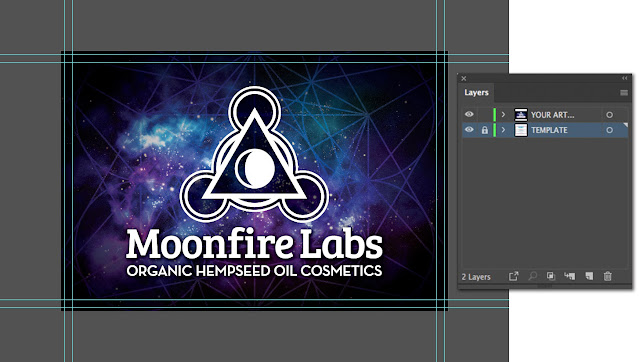
4) Design your artwork on layers ON TOP of the template
The template should always be your base layer. Make sure your artwork extends past the bleeds and covers the full canvas.


5) Save your artwork
When you are finished, delete the template layer and export your artwork as a 300dpi, flattened PDF.


Sunday, March 3, 2019

Rounded Corners


Want an edge? Round your corners! Rounded corners transform your basic square corner by rounding them out, giving the corner a smooth embellishment.


Standard options for rounded corners include a 1/8 inch radius and a 1/4 inch radius option. Custom corners are available too, just contact us!


And you can round any edge you want!
Standard corner rounding includes 2 or 4 corners.


Tuesday, January 29, 2019

EconoLine Display Products

image of EconoLine products, EconoRollup, EconoWall, EconoThrow

Our newly launched EconoLine products offer quality at affordable prices! The EconoLine concept is simple— we provide quality products with fixed options, and you save from our increased efficiency.

The initial EconoLine launch includes 6 Trade Show products and 1 Outdoor Display Flag, but we plan on adding a variety of categories and products in the months to come. EconoLine products come with preset specifications which are not customizable. Additionally, EconoLine items come with free UPS Ground shipping to the contiguous lower 48 states.

Initially, the artwork options will be limited to uploading print-ready files, or adding our custom graphic design service, but will eventually expand to include the use of the online designer tool.

Initial Product Lineup:
  • EconoRollup: A retractable banner stand with 33"x81" 9oz. Polyester fabric UV printed banner and carry bag.
  • EconoTube - Flat: A straight trade show display wall that comes in 8' and 10' widths. The hardware includes a tube frame with feet, which the fabric graphic slips over and zips closed. Comes with a soft canvas carry bag.
  • EconoTube - Curve: A curved trade show display wall that comes in 8' and 10' widths. The hardware includes a tube frame which the fabric graphic slips over and zips closed. Comes with a soft canvas carry bag.
  • EconoWall - Flat: A straight trade show display wall that comes in 8' and 10' widths. The hardware is an expanding matrix that locks in place. The fabric graphic is affixed to the frame with velcro. Comes with a soft canvas carry bag.
  • EconoWall - Curve: A curved trade show display wall that comes in 8' and 10' widths. The hardware is an expanding matrix that locks in place. The fabric graphic is affixed to the frame with velcro. Comes with a soft canvas carry bag.
  • EconoThrow: A 4-sided table throw that comes in two widths to accommodate 6' or 8' tables.
  • EconoFlag: A 16' tall feather flag with a single-sided print through flag graphic. Comes with a ground stake for easy display.
We hope our new family of EconoLine products will help our small business clients on a budget achieve great success!

Shop EconoLine Products.

Wednesday, February 18, 2015

PrintGiant Stock Photographs


Stock Images are a great resource to get the best images for your design. We may occasionally send you what is called a "Lightbox", which is an aggregation of images that we think would be best for your project. Now all you need to do is tell us which image you like best with a few simple steps

Step 1: Review the images in the lightbox and select the image you like best and double-click to open to the image page.


Step 2: Let us know the stock photo number, which is located in the image details. Simply copy and paste the stock image number into an email or our proofing system and send it to us.


And that is all you need to do to let us know which stock photo you want to use!

Friday, December 5, 2014

Proofing a Design: What to look for


Proofing a design can be tricky if you do not know what to look for. Oftentimes you may focus on just the design elements, but you may overlook an incorrect phone number, costing you time and money. It is very important to look over your design in it's entirety and we have developed a checklist to help you do that that! Our checklist is a guide to help you navigate your graphic design artwork when you are proofing.

We suggest starting with the most vital information first: All of the content.
Here are the most common elements to check when proofing:
  • All Contact Details
    • Name(s)
    • Address(es)
    • Web URL(s)
    • Email Addresse(s)
    • Phone Number(s)
    • Fax Number(s)
  • Spelling & Grammar
  • Punctuation
  • Typographical Errors
  • Legal Compliances / “Small Print" (if applicable)
  • Product Codes and Reference Numbers
After you have reviewed your artwork proof for content, you will move onto the second half: The look of your design.
  • Pagination (Confirm the document’s size, page numbering and ordering is correct)
  • General Layout, Color & Imagery
  • Overall consistency with other marketing materials

We also made a printable checklist that you can use to help proof your project:

Download Me: Printable PrintGiant Proofing Checklist - (Right Click > "Save As...")


We hope you found this helpful, but if you have any more questions about proofing your graphic design artwork, please do not hesitate to contact us!